When was the last time you went to a BBQ restaurant to eat seafood?
Yeah. That’s what I thought.
You know BBQ restaurants don’t normally offer seafood on its menus, right?
Well, I’m a die-hard seafood-lover, and as such, I always hold out hope.
Allow me to digress a bit, if you will. You see, even though I love the diversity of food and its various components to make a satisfying meal, I am not a big fan of BBQ. Having NOT grown up eating BBQ, I’d never developed a taste for the sweet and spicy, fall off the bone, lip-smacking, pulled pork, or ribs, beef or chicken, you know, the stuff that makes good BBQ.
Sure, when I was a kid, I’d eaten BBQ on a few occasions. I’d dip a dried-out breaded chicken tender into the sauce. You know, an out-of-the-bottle name brand, like, Texas Slather, or something to that effect. For me, it was a fancy ketchup-remember I’m from Pittsburgh, a place where people brag about putting Heinz 57 ketchup on just about everything.
Yeah, I know, sounds freaky. Maybe you had a similar experience.
Or not.
Anyway, for me, eating BBQ was a rare experience.
Years later, when I’d worked the food trade shows, I’d sold everything you’d need for good BBQ, spices, oil, vinegar, pork, beef and tomatoes, but I’d make every effort to steer clear of the trays of steaming wings, ribs and crock-pots of pulled pork at the food shows.
I was afraid. I didn’t want to form an opinion. (Not about this anyway).
I was up against people, (experienced, knowledgeable, Southerners), who not only had strong opinions about what constituted BBQ sauce, but would harm others (usually in the form of backhanded, ugly, verbal slights in future marketing sessions or after a few rounds of post-show cocktails) based on their experience and desirability of a certain type of BBQ sauce. Spicy vs. sweet. Vinegar-based or not. Wet vs. dry. See what I mean?
At one point in my food service career, (towards the end), I’d represented a pulled pork BBQ product from North Carolina. It had a vinegar-based sauce. Packaged in two-five gallon tubs to the case, ready to heat and serve, it was the ideal food service product for folks that didn’t want to go through the effort to smoke their own. But no matter how many half pound plastic containers I’d sampled, I’d never placed the product. I’d thought it was a good product, despite my limited BBQ knowledge. In fact, if memory serves me correctly, I’d not sold one case.
Ever.
I’d chalked it up to the wrong demographics. That and I couldn’t get it stocked at my wholesale distributor. HA! That was the biggest joke of that job, but I digress.
Since that time, I married a man who hails from the northern most southern state of the USA, Kentucky.
HE LOVES BBQ!
Me? I’ve learned to like the stuff. A little. Certainly enough to go to the corner BBQ joint in my old neighborhood. But I didn’t go eagerly, at first.
WildSide Bar & Grill came on to the food scene about the time my old neighborhood in Orlando was undergoing a major transformation. Affluent gays were abounding, pouring pre-recession dollars into the community, and developing the once run-down, historic area to a cultural mecca replete with restaurants, shops and the amenities that any city dweller in an upscale neighborhood would want.
Elvis and his friends would sit at the outside bar, watch the passerby’s, smoke cigars and knock back a few cold cocktails, on any given night of the week. The restaurant became a huge success. Its staff, twenty-something’s, offered friendly, swift service; its menu was diverse and good; it offered live entertainment, and consequently, the crowds poured in. It became the perfect place for Elvis to hang when I didn’t want to leave the house or cook dinner. Or when I had an acting class, or met up with my friends for a movie-a “ladies night out.” It was “his” place. A “guy’s-night-out” kind of place.
But eventually I broke down and was lured in. You see, WildSide created a dry-rub for its pork, beef and chicken, a secret spice combination, and then they smoked the beef, chicken, ribs and pork in an oversized, black cast-iron smoker on the outside of its building. And they started this process early in the morning, say, when I was out in the ‘hood on my morning run. (I didn’t even know what the term, dry-rub, meant. Pretty sad, huh? I mean, I’d been in the food business for twenty years. But I guess that’s what happens when you stick your head in the sand.)
So anyway, one morning after a run, I’d mentioned this deliriously, smoky, heavenly smell to Elvis-how the unbelievably rich aroma coming from the BBQ joint encouraged me to run around the block a second time, totally off my routine.
He knew he’d had me, I’m sure of it now. He said, “They have seafood on the menu, you know.”
“Huh?” I mustered.
“Yeah, if you came with me, you’d know. Their food is really good.”
“But I don’t like BBQ,” I’d protested in a somewhat snobby voice.
“Let’s go to lunch, You’ll see.”
I don’t know if I hate it more when he’s right, or when I have to admit it.
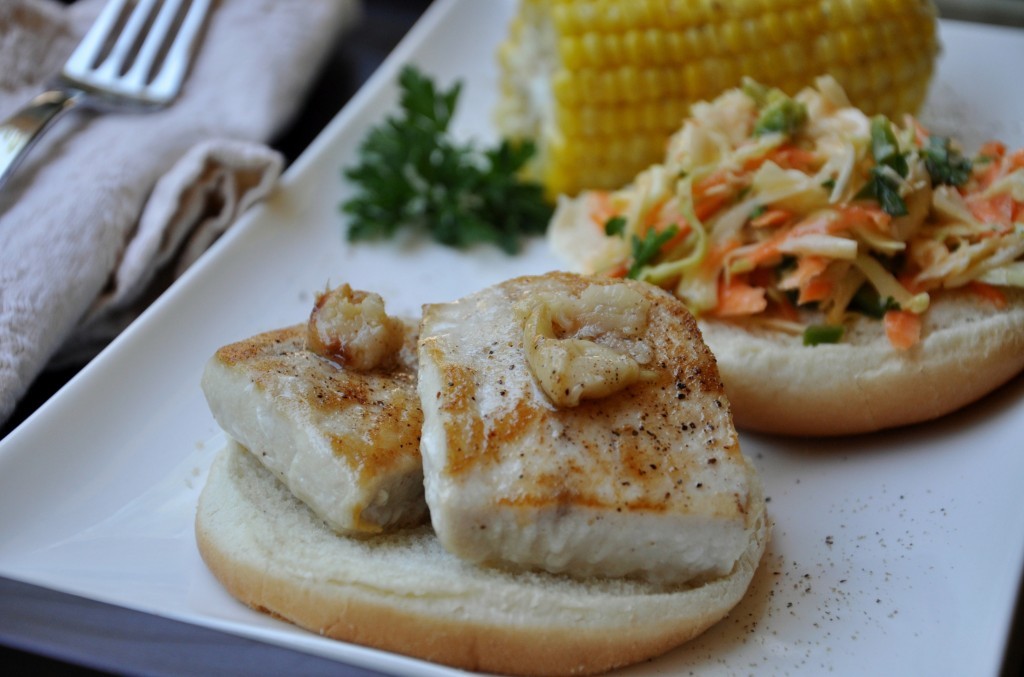
Here’s my version of WildSide Bar & Grill’s “Asian Style” Grilled Mahi Sandwich. The meaty mahi holds up well to the crunchy, spicy-peanut Asian slaw. Slathered with roasted garlic and served on a soft white bun, lightly buttered and toasted, mmm, I could eat those sammies every day. I’d like to say, “meet me there, if you don’t want to cook,” but the drive is a bit much for me these days. Just trust me, you’ll like my version. Or check out WildSide Bar & Grill for yourself. They now have three locations.
Thanks WildSide for the inspiration, memories and great mahi sandwich.
Mahi Sandwich with Roasted Garlic and Asian Slaw
Serves 4
Cook’s notes: Both the roasted garlic and the slaw can be made ahead to save time. Make the slaw a day ahead if possible or at least a few hours. Roast the garlic and refrigerate up to four days ahead. If using frozen mahi, thaw in the refrigerator twenty-four hours ahead.
Asian Slaw
- ½ head green cabbage, finely shredded
- 1 carrot, peeled, trimmed and grated
- 1 medium jalapeño, seeded and sliced into slivers
- 2 tablespoons apple cider vinegar
- 2 tablespoons mayonnaise
- 3 tablespoons prepared satay sauce
- 2 teaspoons agave nectar (or honey)
- ~sea salt
- ~black pepper
- ~1 teaspoon chopped parsley, plus sprigs for garnish if desired
- In a medium bowl, mix all ingredients. Cover and refrigerate until ready to serve.
Roasted garlic
- 2 whole medium garlic heads
- 4 tablespoons of olive oil, divided
- ~sea salt
- ~black pepper
- Preheat oven to 350 degrees.
- Line a baking sheet with foil. Remove the paper from the garlic. Place the whole garlic on the foil, drizzle each with 1 tablespoon of olive oil. Wrap the foil around the garlic, tightly and bake for one hour.
- Remove the garlic from the oven and let it cool in the foil for at least fifteen minutes before removing it from the foil.
- The garlic will be soft and creamy and should come out of the husk easily. Use a small knife or scissors to cut the husk if necessary. Place the roasted garlic in a container and add the remaining oil to it. Season the garlic with salt and pepper. Cover and refrigerate for three to four days. Remove from refrigerator one hour ahead of cooking time.
Mahi Sandwich
- 4 four-six ounce portions boneless, skinless mahi
- 2 tablespoons canola oil
- ~sea salt
- ~ black pepper
- 1 tablespoon butter
- 4 white sandwich buns, the softer, the better
- Preheat the oven to 400 or if you’ve just roasted the garlic, increase the heat to 400.
- Rinse the mahi in cold water and pat dry with paper towels. Season the mahi with salt and pepper.
- Arrange the soft white buns on a baking sheet, cut side up and spread butter on each, then turn the buttered buns cut side down.
- In a large stove top to oven skillet, heat the canola oil on medium high heat. If you don’t own a stove top to oven skillet, use the skillet you have and spray a shallow rimmed baking dish with oil.
- When the oil is shimmering, about three to four minutes, place the mahi in the skillet, top side down. Sear the mahi for two minutes. Do not move the fish at this point. Use your kitchen timer, two minutes goes by quickly.
- Turn the fish in the pan and place the entire skillet in the oven for an additional four minutes, or transfer the fish to the prepared baking dish and place it in the oven.
- Place the baking sheet with the buns in the oven at the same time.
- Remove the mahi and the buns from the oven and arrange the sandwiches on a large platter for family style serving or on individual plates.
- Top each piece of mahi with a roasted garlic clove (or more if you love roasted garlic) and add a generous portion of the slaw to the bun lid.
- Serve immediately.
Need more info on cooking times for fish? Check out my 10 minute fish cooking rule here.


