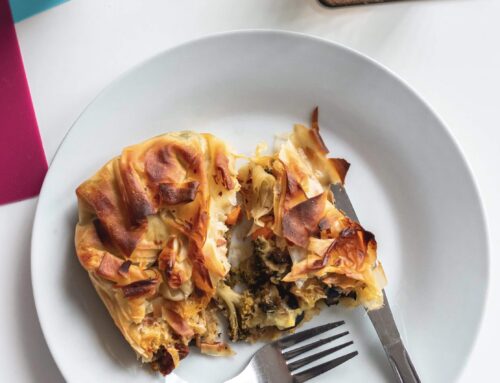
A great galette needs only a few ingredients, and it doesn’t matter how messy it looks.
In fact, that’s the essential nature of baking a free form, one-crust pie. No one pie will look the same, and they shouldn’t either.
I’m obsessed with baking galettes. These rustic pies have character. And with only one crust, you won’t have the overly full feeling that comes from eating too much pastry.
Admittedly, I came to baking pie late in life. In fact, I didn’t especially like to eat pie until I moved to Kentucky in 2011. Prior to moving here, we’d occasionally drive from Florida to Kentucky to babysit Reagan, our beloved wire fox. On one trip we stopped in northern Tennessee at an old-fashioned restaurant where I met my first handheld pie. I bought one apple pie. By the time we hit the four-lane highway to continue on our journey to western Kentucky, the pie was gone.
Many months later, we drove that same route. This time, I was wiser.
I bought every available variety of handheld pies—chocolate, apple, peach, lemon, and blueberry. Thus, my love affair with pie began.
While I learned to love the flakey, delicate, pastry (and sometimes, the chewy, buttery variety), and the cooked fruit and preserves, I was intimidated by baking pie. Until I found my muse.
I had been writing my first cookbook, researching book events, when I found Kate Lebo. Kate was doing Pie & Whiskey, a literary event in Spokane, which involved, yep, pie and whiskey. I immediately bought her cookbook, Pie School, and inside was the pie of my dreams—a galette. The rest is history.
My Peach Mango Bourbon Galette recipe may seem long, but don’t be intimidated by my wordiness. I want you to feel confident as I am, so I sprinkled a few tips in the directions, along with several notes’ sections, so be sure to read the entire recipe to the end. Then get baking.
Peach-Mango-Bourbon Galette with Bourbon Whipped Cream
Yield: One crust pie, serves 6-8, or serves 1, you choose
Ingredients
For the Galette Crust
½ cup buttermilk
1 ¼ cups all-purpose flour
1 teaspoon kosher salt
1 stick butter (1/2 cup), cold, cold, cold
1 egg
1 teaspoon water
¼ cup demerara sugar, + –
For the Peach-Mango-Bourbon Filling
4 medium peaches
1 mango
2 tablespoons butter
2 tablespoons bourbon
Juice from half a lemon
2-3 tablespoons sugar, depending on the sweetness of your fruit
2 tablespoons all-purpose flour
For the Bourbon Whipped Cream
1 cup heavy cream
2-3 tablespoons confectioners’ sugar
1 teaspoon vanilla
1 ½ tablespoons bourbon
Baker’s Notes
- You can prepare the pie crust up to one day ahead and refrigerate. Or, up to one month and freeze. Remember to remove the dough disk from the freezer the day before you want to bake. I find I get the best results when I bake the pie immediately after I’m done fussing with the fruit.
- Measure the buttermilk in a pourable spout container and place it in the freezer. You want it to be super-cold, not frozen. Don’t have buttermilk? Add one half tablespoon of white vinegar (the stuff you wash the windows with) to a 1/2 cup of milk. Let it curdle (about ten minutes), stir, then place it in the freezer.
- Many people bake their fruit before they fill the pie crust, but that’s not how I roll. This pie bakes for an hour, don’t worry, your fruit will be cooked.
- Place your mixing bowl and electric beaters in the freezer until you are ready to whip the cream.
- Only use bourbon that you would drink. I use Blanton’s, but it’s a top dollar, and not available in every market. An inexpensive, premium option is Elijah Craig, which is widely available and conveniently imparts a cinnamon flavor, an excellent complement to peaches and mangos.
- Fun bourbon fact: September is Bourbon Heritage Month.
Directions
- Add the flour and salt to a medium-sized mixing bowl. Whisk.
- Cut the butter into chunks, some small like a cherry pit, others larger like an almond. Drop the chunks into the butter, then using your hands, toss the chunks to coat. Make wells with your hands and begin to scoop flour and butter chunks into your hands, rubbing the butter between your fingers. Repeat the process thinking about your last amazing vacation, or your next vacation if you’re headed out into the world, until the flour looks like a combination of cornmeal and chunky flour. Work quickly, but not aggressively.
- Remove the buttermilk from the freezer and drizzle it a little at a time into the chunky flour, using a fork, silicon spatula, or large spoon to combine, baker’s choice. We all have our methods. When the mix starts to come together but is still a bit shaggy, turn it onto a floured cutting board and form it into a ball, then flatten the dough into a disk about six inches across. Wrap the dough disk tightly in plastic wrap and refrigerate while you get the fruit ready.
- Preheat the oven to 450 degrees. Hahaha, you wondered when I would get to this step, didn’t you?
- Cover a rimmed baking sheet in parchment paper. I crumble my parchment up in a ball, then smooth it out on the baking sheet. If I don’t, the sides roll up—I’m easily annoyed by these things. You do you. If you’re using parchment sheets, or a silicon mat, ignore this weird ritual.
- Bring a large stockpot of water to boil. Fill a large bowl with ice water and place it next to the boiling water pot, if possible. Maybe you don’t have a counter near your stovetop, if not, keep the ice bowl close. Score the peaches on both ends and add them to the boiling water. Boil for about two minutes (set a timer to stay focused), turning them once or twice, while they bounce around in the boiling water.
- Use a spider or large slotted spoon and remove one peach from the water. Use a dry paper towel to pull the skin from the flesh. If it resists, put it back in the pot and boil an additional minute. Repeat this process and if the skin peels away easily, remove all the peaches from the boiling water and immediately plunge them in the ice water. While the peaches cool in the water (and firm up again), peel the skin from the mango and cut the flesh from the center pit. Try to cut two symmetrical sides, and then cut the two sides of fruit into equal half-moon shapes. Continue to trim the flesh away from the oval center pit. If the mango is slipping around, use a paper towel to secure it.
- Peel the peaches and break the fruit apart into halves to remove the pit. Side note: When I was a kid, I’d dry the pits in the sun, then scrape the tops on the cement until I met the hollow center, to produce a whistle. Did anyone else do this? Anyway, back to the peaches. Cut the peach halves into quarters and then again. You want all the fruit to be the same-ish size for the best cooking results.
- Add all the cut fruit to a large bowl. Cut the butter (yes, more butter) into small chunks and gently stir it in the fruit. Sprinkle the bourbon over the fruit. Add the lemon juice, sugar, and flour, then stir gently, gently, gently.
- Remove the pie disk from the refrigerator. Flour the cutting board and rolling pin. Unwrap and roll out the dough. For each roll, lift and turn the dough, as you roll it out. Watch my How I Make a Galette video on this technique if you need a visual. If your dough is not pliable, let it sit for a few minutes until it is. Sip some bourbon if you want. Once the dough is roughly a little bit wider than the baking sheet, fold the dough over the rolling pin, lift it and pat off any excess flour. If you don’t, your crust will be tough.
- Place the rolled-out dough on the baking sheet (the one you lined with parchment).
- Pile the fruit in the center by the spoonful leaving a solid two-inch outer band of pie dough. Note: Some fruit will weep, and you don’t want all the liquid in the bottom of the bowl of fruit. Arrange the fruit decoratively if you want, or not.
- Begin to fold the outer band of dough up and around the fruit, pressing lightly to seal the edges. Again, refer to my video if you need assistance with this step.
- Stir a teaspoon of water with egg in a small bowl and beat. Brush the dough with the egg wash, covering the outer surface, not the fruit though.
- Sprinkle the demerara sugar over the entire surface of the pie.
- Refrigerate the uncooked pie for thirty minutes.
- Remove the pie from the refrigerator and bake in the 450-degree oven for fifteen to twenty minutes, or until the crust starts to turn a soft golden color.
- Reduce the heat to 350 degrees and bake an additional fifty to fifty-five minutes.
- Remove the pie from the oven and cool on a baking rack for several hours, or until the next day.
- An hour or so before you serve the pie, place your electric beaters and a small mixing bowl in the freezer for twenty minutes.
- Whip the cream on high, adding the confectioners’ sugar, a little at a time. Add the vanilla and bourbon, whip until soft peaks appear. If your whipped cream is runny, add a tablespoon of confectioners’ sugar at a time until desired consistency. Don’t over whip or your cream will turn clumpy. Serve with the pie, Cover and refrigerate for a day or so.
More Notes
- If you have a blowout on your pie, don’t worry, these things happen. That means your dough was stretched too thin in that one spot. Eat that jammy, sugary part first!
- Your galette will hold well at room temperature for two days. Cover with a clean, lint-free towel. After that, cover with plastic wrap and refrigerate.
When you make this pie, snap a picture and tag me on social! Feel free to email me with any questions or comments. I’d love to hear from you. Feel free to share this Peach Mango Bourbon Galette with your friends and fam.
Xo,
M